Monday, May 10, 2010

Disappearing Nine-Patch Tutorial

I've been busy sewing the last couple of days using a new-to-me technique. I've always been fascinated with the Disappearing Nine-Patch (D9P) pattern because of its versatility and ease in making a quilt that looks as though you spent a lot of time on it. Although there are several good tutorials for this pattern, I developed this tutorial so that even a beginner could master this fun technique.

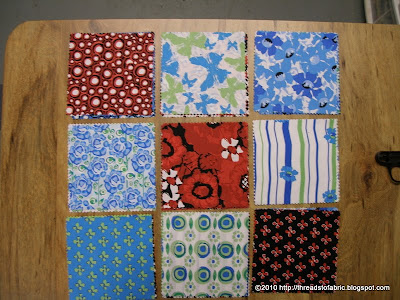
I started with two charm packs.

I separated the packs into colors because although my design will be scrappy, I wanted to use the red for my center block.

Next I laid out my nine-patches on my sewing table so that I could quickly assemble them.

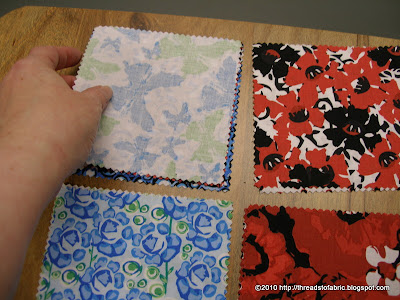
By following my planned layout, I placed the top middle square onto the upper corner.

Carefully lining up the edges.

Before sewing the 1/4" seam.

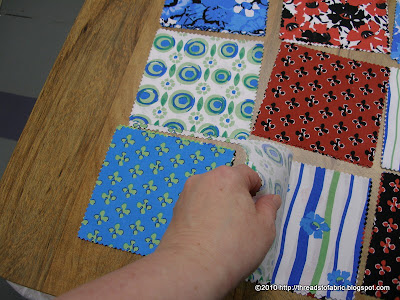
I followed the same process for the middle row.

And the third row.

I chose to press the seams as follows: For the top and bottom rows, I chose to press the seam towards the outer corners, For the middle row, I chose to press the seam towards the middle square. To achieve this, place the block you want the seam to be pressed towards on top before pressing.

The first step in pressing your seam is to set your stitches by pressing the closed seam.

After setting your stitches, you open up your seam and finger press it before pressing with your iron. I have found by finger pressing the seam first, it ensures my seams are opened fully and I retain the correct seam allowance and block size.

When pressing the seams, it is critical to take care and press in an up and down motion. If you move the iron back and forth, you risk distorting your fabric and you will have problems achieving accurate blocks or matching seams.


This is what my nine-patch blocks looks like at this point.

Repeat this process for the third block for each row.

After pressing the seams, it is time to join the horizontal rows.

Take the top row and place it onto the middle row, lining up the edges.

By pressing the seams using the method I did, I will be able to easily match my seams and achieve perfectly matched corners.

Lay the seams on top of each other.


As you slide the seams against each other, you can feel when they but up against each other. I prefer not to pin my seams, unless they are in more complex piecing patterns. However, the seams can be pinned to ensure the seams don't move while you're stitching the seam.

Once the seam has been matched, I hold onto it until just before the seam is stitched. Sometimes I will use a stiletto or wooden skewer to hold the seam in place until it is stitched.

Press the seam to set the stitches. I chose to press the seams towards the top and bottom horizontal rows.


Open up the seam by finger pressing before pressing it with the iron.

Perfectly matched seams. Follow the same process with the third horizontal row

Here are my five nine-patch blocks.

The next step is to make a horizontal and vertical cuts down the center of my nine-patches. Because I started with 5" charm squares and I used 1/4" seams, I measured 2.25" from the seam to find my center of the middle vertical row.

Cut through the center.

Turn each half and follow the same process to find the center and cut.

Each section was squared to 7" before I played with them on my design wall.

I placed the squares on my design wall and played around with the layout. Once I chose the layout I wanted I reassembled the 7" blocks into larger blocks by joining four per block. I then squared up the larger blocks to 13.5" before joining them. The final row consisted of four 7" blocks which I joined into one row before adding it to the upper section.

I decided to add two borders to finish the quilt top. The red border was cut 1.5" in width for a finished 1" wide border. The outer border was cut 5" in width for a 4.5" finished width. To determine the length, I measured the center for both horizontal and vertical strips. By measuring the center I won't have to worry about sagging borders. Also, the border strips were cut on the grain to prevent stretching of the strips.

Wednesday, May 5, 2010

Challenge Blocks - December and January

I've gotten behind on my Challenge blocks and have been trying to catch-up. During our sew-in a couple of weeks ago, I managed to complete two of them.


My friend Judy selected Country Farm for December's challenge block. What should have been a relatively simple block to assemble turned out to be very frustrating and I had to redo it. The above picture is my second attempt. As you can tell, all of the intersecting seams match and I have an accurate 1/4" seam for assembling the blocks together.

This is my first attempt. What a mess! The center four-patch didn't lay flat and was very puffy, some of the intersecting seams didn't quite match, and I was missing the 1/4" seam allowance for assembling to other blocks.

Initially, I had planned to assemble this block during January's sew-in and cut the pieces out a day or two prior to our scheduled sew-in. However, my MIL was hospitalized and I wasn't able to attend our sew-in causing the block to sit for a couple of months. My guess is in my rush to prepare everything for our sew-in, I accidentally cut some of the block pieces inaccurately because it went together quite quickly the second time around. Once I completed the redo of this block, I really like it and will probably use it again.


My friend Billie selected Quatrefoils for January's challenge block. This block went together very quilter since I had made it a couple of months ago for one of my friends in our Birthday Block Swap. While assembling this block, I really struggled on my fabric choices. I swapped the colors from the initial pattern, using light for dark and vice versa. When I was playing around with my layout choices I happened to change my color choices and almost switched the dark blue corner squares with the lighter lavender print. It would change the appearance of the block completely, but I really liked it. I'm probably going to do another one of this block with that layout to see how it would look assembled.

Two down and three more to go! What are you working on?

Tuesday, May 4, 2010

Houston, We Have a Problem...


And it's been a roller coaster! We have had a couple of strong storms hit us in the last couple of days causing lots of fallen trees and power outages. Monday I lost power seven or eight times. It wasn't out long enough to cause any discomfort, just enough to reset our electronic clocks. I had no idea how many of those we have in our home! After resetting them the third time, I left them blinking until I went to bed.

To compound my frustration, I lost my Internet connection. We live in a rural area where DSL isn't available and Dial-up is extremely painful. So we access the Internet via satellite. What a problem this has been! I was finally able to get it working on our desktop but my laptop still can't connect to our router. Of course all of my files are on my laptop and it can be a hassle transferring the files to a flash drive and try to retrieve them via the desktop which uses VISTA for its operating system. I definitely do not like VISTA and have been boycotting it since its debut.

Now you know why I have been absent and hopefully I'll be back to regular posting tomorrow. I really do have some things to share. I promise...

Wednesday, April 28, 2010

Signature Block Swap

I received my Signature Block Swap swap-out on Saturday:


I think all of the participants did a fabulous job on their blocks. Initially, we had ten people sign up for the swap but one person didn't complete her obligation so I only have nine blocks. I'll have to play around with the layout to see what I'm going to do with them.

What are you working on?

Monday, April 26, 2010

Join Me For Some Eye Candy?

I spent all day Saturday visiting with a group of friends while sewing, laughing, eating, and laughing some more. There is nothing better than spending the day with friends.

Each month we have a potluck based on a theme of which I'm the coordinator of. This month I chose a theme based on the movie Steel Magnolias and the character's band of friendship. We had Po'k and Beans, Potato Salad, Biscuits and Gravy, Deviled Eggs, Iced Tea, Cookies, Ham and/or Roast Beef Sandwiches, and BBQ Smokies and Meatballs. Yummo!

Aside from the laughs and food that we all share, one of my favorite events at our sew-ins is show 'n tell. Who can walk away from eye candy?


This quilt was made by my friend Diane while participating in a mystery challenge and quilted by my friend Jo Ann's husband Larry. It is made from gorgeous Batiks and the feathers Larry quilted really showcase the quilt's design. Spectacular quilt!


This was created by my friend Joy. She does some of the best appliqued quilts I've seen. I know many quilters who have cats and I'm sure each of them can relate to the four cats depicted in this quilt. LOL


Here is another quilt created by Joy. If I remember correctly, she made it for a local library and the one above is a duplicate of what she gave to the library. I just love the alligator dancing on top of the books while playing the saxophone. If you look closely, you can see the ladybugs crawling along the vine around the alligator. Precious!


While we were at the sew-in, Joy was working on this clock. It is part of a Baltimore Album quilt she's working on. Isn't her work beautiful?


My friend Vicki makes a lot of humanitarian quilts and does beautiful work. She is also an expert at applique. This quilt pattern is called Yellow Brick Road and is very popular among quilters who donate their quilts. I love the bright fabrics Vicki used.


Here is another humanitarian quilt assembled by Vicki using the Yellow Brick Road pattern but with different fabrics. This would make a cute baby quilt, don't you think?


Vicki made this quilt in celebration of our annual Tulip Festival. She did a great job creating a scene of our tulips fields during the festival.


Here is another quilt created by Vicki. I love this wall hanging. A couple of us tried to convince her to donate this to us, but she wasn't falling for it.

One of our group challenges this year is a Round Robin challenge based on a Christmas Carol. The challenge was set for 6 months where each month we are given a set of instructions and we all carry out those instructions by working on our own quilts. Unfortunately, due to circumstances beyond my control, I am behind on my challenge quilt and am only on challenge one...


This one is Daisy's Round Robin challenge. The first part of our challenge was to create a 22 1/2" block based on a Christmas Carol. Daisy chose Let It Snow, Let It Snow. The second challenge was to add a 2 1/2" border, followed by the third challenge of setting the block on point by adding corners. Our fourth challenge was to add a 4 1/2" pieced border (if I remember correctly), and the fifth challenge is to set the block on point again by adding corners. Our sixth challenge is to add a 6 1/2" border.


Here is a close-up of Daisy's initial block and pieced border. I think she has done a fantastic job.


This one is my friend's Jo's Round Robin Challenge. Hers is based on the Christmas Carol 'Twas The Night Before Christmas.


Jo did a lot of beautiful embellishments on her challenge quilt. Unfortunately, the picture doesn't really showcase it. Jo is another one who's applique skills are what I term as expert.


I had to take a close-up of her border to showcase her beautiful work. She chose a real creative way to continue her Christmas Carol theme into the outer borders by adding additional applique.

Not bad for a Saturday afternoon... What did you do?

Friday, April 23, 2010

I've Been Busy...

My week has been busy trying finish up my signature blocks while preparing for a sew-in on Saturday. Initially I thought I'd finish the signature blocks on Tuesday but that didn't happen.

On Tuesday I discovered it isn't a good idea to plug in two irons at the same time and on the same circut. Even if one of the irons is a small one. So I blew a breaker and couldn't find which one needed to be reset. After flipping all of the breakers off and on for about an hour I finally gave up. I had lost all of the power in my sewing studio. It wasn't until an hour or so later that I remembered we have a second electrical box. It's hidden in a different area of the house and was installed during some construction on our house. My sewing studio is wired into this electrical box and I was able to find the flipped switch as soon as I opened the box. Well, now I have power but it's late in the afternoon and I no longer felt like sewing.

The last couple of blocks went together rather quickly...


Except for one hiccup. Because I was making a couple of variations of the block, I had multiple prints per piece and I guess I wasn't paying attention and was stitching two different prints for the heart section of the block.


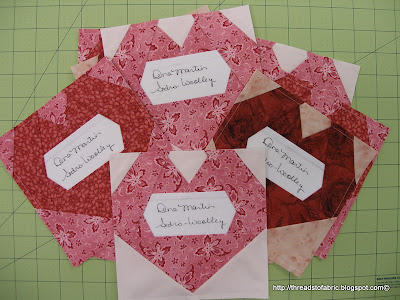
Here are my three versions of the block. I'm not sure what my favorite one is, but I'm a little partial to the upper left corner one with the soft pink as the background. I really fell in love with the pink/red/floral print and had to go back to the quilt shop and purchase an additional 5 yards of it. I'm not sure what I'm going to use it for, but I have it for when I do.


Here are all my completed and signed blocks. I can't wait to see what everyone else has done. Our swap out is on Saturday during our sew-in so I should have a picture to show you next week.

With my signature blocks completed, I had to run to the quilt shop to pick out two green fat quarters for our drawing on Saturday....


As you can see, I have no self-control. I found the two green fat quarters, as well as five more fat quarters and four yards of a couple of other prints. Love them brights.


I've already been cutting and assembling... (these two prints are from my resources)


Into vibrant Jake's Heart blocks.


As my contribution in a comfort quilt for a friend who is having surgery. Oooh, I really love those brights!

So what's on your work table?

Monday, April 19, 2010

My Weekend Progress...

I spent many hours in my sewing studio this weekend working on my Signature Swap blocks. For the most part, they went together rather quickly and without too much drama.


Last week I cut all my fabric pieces to size and sorted them according to the piece numbers and whether it was for the heart, background, or signature. If you've seen my tutorial on How To Paper Piece, you know I prefer to store my cut fabric in ziploc bags with the number of pattern piece and it's dimensions written onto the baggie. This way of organizing may not work for everyone, but it works extremely well for me. I'm one of those fanatics who hates to look for things... It breaks the rhythm!


Here is one version of my block, minus my signature. The Signature block pattern creates a 6" finished block and it is taking me about 20 minutes per block as long as I don't have any interruptions. So why am I taking so long to finish them you ask? Well, between the telephone calls, laundry, and husband, I'm lucky if I can get three pieces assembled before I'm interrupted. LOL

I'm hoping to have them completed this afternoon so I can move on to my next project on my To Do List... 

So what are you working on?

Tuesday, April 13, 2010

What I'm Working On...

I spent today preparing my fabric to begin working on my Signature Swap blocks. I have almost all of the pieces cut so I can start paper piecing. It should go quickly, but we'll see.

Unfortunately, I don't have any pictures to share with you since I didn't do any sewing today. So, I'll leave you with this...


The true meaning of friendship. I hope you're getting lots of sewing / quilting done. I'd love to hear what you're working on.

Monday, April 12, 2010

Giveaway Winner...

And the winner of my first giveaway is:

Susan, author of Hanging On By A Needle and A Thread blog.

Congratulations Susan! Send me your snail mail address (denajmartin@msn.com) so I can get your package in the mail.

Thank you to everyone who entered. I'll be having another giveaway soon.

Friday, April 9, 2010

Birthday Swap - Block 2

I made the second block for my Birthday Swap group and have another one in the making for the month of April.


This one was made for my friend Judi. She requested a block of a flower in a size that is divisible by 3. I selected the above block that measures 3" x 6". It's a paper pieced block I found on Piece by Number site. I was not thrilled with the block and how the two sections joined together. I had to resew the joining seam a couple of times and this is the best I could get the stem and the flower to match. Of course, the most important thing is that Judi liked it and she did.

If you haven't already signed up for my giveaway, please do so. I will be selecting the winner Monday. To sign up, see last Monday's  post.

What are you working on?

Monday, April 5, 2010

100th Post Giveaway!

It'd hard to believe that this is my 100th post. When I first began my blog I wasn't confident I would have enough to say to attract any followers. However, through this blog I have met many other bloggers and blog followers who share many of the same interests and ideas as I. To celebrate this milestone I am hosting my first giveaway.


To enter this giveaway, become a follower and leave a comment. If you're already a follower, simply leave a comment and I'll add your name for the giveaway. The winner will be announced next Monday.

Good luck!